mockupscreative.com – May your days always be great! On this occasion, we will look at a DIY corner shelf made using used doors but still in decent condition. This shelf that I made is the furniture that I admire the most in my life because it is simple but beautiful.
Follow the steps that I will describe below so that you also try to make it with your partner. The method is quite easy but will produce extraordinary work. The time required is also not much; the best thing is that you don’t have to spend a lot of money on this. As long as you have high creativity, then you will be able to produce good work without wasting money.
Contents

DIY Corner Shelf Tutorial
The following is a tutorial on making a DIY corner shelf: How to take advantage of an old door that is not used by turning it into a corner shelf in your home. Not all obsolete items should be removed. We just need to rack our brains a bit to make it more useful and maybe make some money.
When we managed to buy a new house 5 years ago, Davis and I made this corner shelf. From the beginning, this door shelf did not have white color, then I painted it using brown oil to bring out the original color of the wood first, then I painted the door white as the base color. The style and design of the shelves this time are quite different from what I usually do. I think my artistic ability has developed enough this time. I did a make-over on this door shelf using spray paint to make it look more attractive.
Turn The Door Into A DIY Corner Shelf Without Change The Shape Of The Door Significantly
Sometimes the authentic side will give the impression and a higher artistic value than having to completely change it. Just take advantage of what is there without wasting a lot of time, effort, and money. The most important thing is to provide care so that old item can look new again.
I purposely put the corner shelf in my living room so that the view becomes more refreshing. I chose lime green and turquoise because they looked unique and unusual. Display shelves that are attractive and quite striking made me decide to make them the center of attention or the main decoration in my sitting room. I will do the work in the room with pleasure.
I need to convince myself whether the dark color of the lime green and turquoise combination paint will remove. Maybe it will eliminate the modern vintage impression that I deliberately wanted to create in the room. After all, vintage themes are really in vogue these days, and they are nice and fun to look at.
A flower-shaped ornament I made with milk glass material to complete the front of the DIY corner shelf. Although the material is simple, I mold it well. The flowers that I made were then put in a vase to make the buds look more blooming. It makes me even more excited!
I replaced the doorknob with a vintage-looking shape, shaped like cream frosting on a birthday cake. The shape is very beautiful like a white diamond. A knob that not only looks vintage but also luxurious and elegant.
Preparation
 Following are the steps to make a DIY corner shelf from an old door. The supplies needed are:
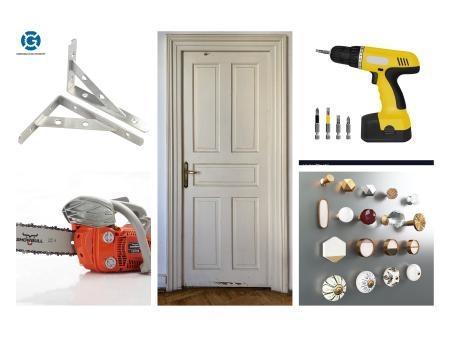
- A door (you can use any door model as long as it’s in good condition and allows for processing)
- Saw (it’s easier to use a chainsaw with engine power, but not to knock down trees)
- Screwdrivers (can also use an electric screwdriver)
- Screws with various sizes
- Brackets made of metal with specifications L 13-90 degrees
- Paper,
- Door knobs with unique shapes (adjust to your taste).
Step-by-step Tutorial
- In the first step, I cut the door into two parts using a saw that I have. It is necessary to draw a line in the middle and measure it fairly so that the results of the cut are balanced.
- Once cut, to avoid the risk of damage, do not lean the door in a tilted condition against the wall. It is safer to place it on the floor or a large table at an angle of 180 degrees. You can also use auxiliary tools such as clamps. Install the screws on the metal bracket at a 90-degree angle in the center of the door.
- Make 4 pieces of wood that form an angle of 90 degrees to fit the size of the door that has been divided into 2 and installed brackets, you can also make it only into 3 shelves or 5 shelves, it’s all up to you. I made the outside of the DIY corner shelf round; you can also make it straight ahead. If it is curved, it will provide more space.
- Each shelf is then installed with a bracket at the bottom to support it so that it is safe and strong to withstand the weight of the object that will be placed on it so that the overall wood surface becomes smoother. Then, we need to sand it. Choose and adjust to your liking, you want how smooth.
- You can change the knob or keep the original for a more vintage look; it’s all up to you. Install the knob on one side only so the other part can be attached to the wall. The knob on the back will leave a gap between the shelf and the wall and it doesn’t look good.
- Start to paint using the color you like. You can also try experimenting to make colors that you never imagined. If necessary, make a painting so that the result of your DIY corner shelf is more beautiful.
Conclusion For DIY Corner Shelf
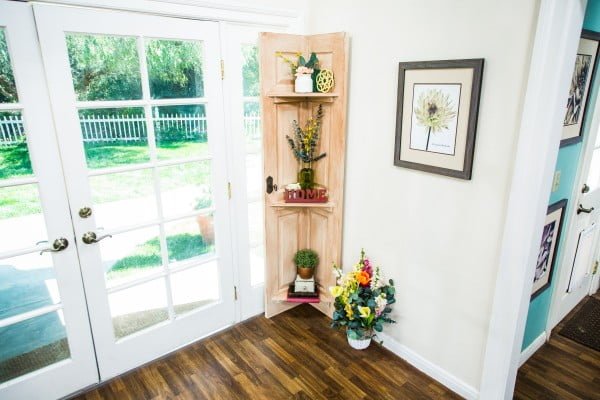 That’s the step we took to produce a beautiful DIY corner shelf in my break room. I am very happy with the result. One day if I find an even more interesting door, I will make another door shelf with a more unexpected design. Good luck!
